Who is this Project For?
This is an intermediate-level project for those who are new to Scratch. Before beginning, you should already have some basic experience with Scratch. This includes knowing how to create costumes and variables and use if-statements and operators to control the game. These will be the core concepts used in this project.
What Will We Learn?
This project focuses on using knowledge of Scratch components like if-statements and operators. By the end of the project, you will be able to use these concepts to create a fun and simple game.
Features to Consider:
- The game should have 4 coloured squares arranged in a 2x2 grid in the center of the screen.
- The game will start by flashing one coloured square.
- The player will click on the square that was flashed.
- If the player chooses correctly, the previous square and another square will flash and the player will need to copy the order.
- The game will keep a count of how many times the player has successfully completed the pattern.
- If the player chooses wrong, the game is over.
Main Steps:
This project has 6 main steps:
- Create the sprites
- Create the ‘add’ command
- Create the ‘sequence’ command
- Add the ‘if this sprite clicked’ code for each tile
- Create the ‘if green flag clicked’ code
- Add the ‘game over’ code
Step 1: Create the sprites
The first thing we’ll need to do is create all the sprites we need for the game. We will need to create four coloured rectangle sprites, each with a bright costume and a dull costume.
Hint: When we alternate between these costumes quickly, it will look as if the square is flashing. We will also need to create a game over sprite. In this case, I’ve made a large ‘X’ sprite with the words ‘Game Over’ on it.
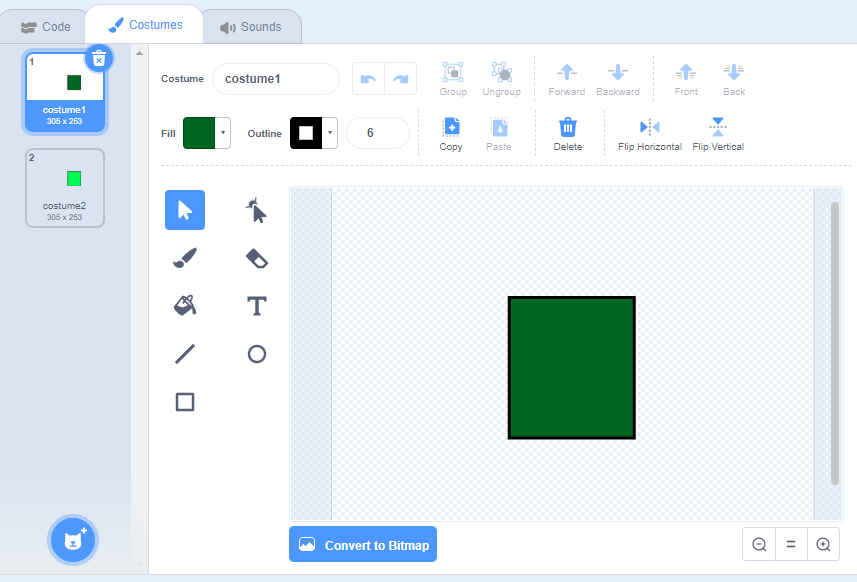
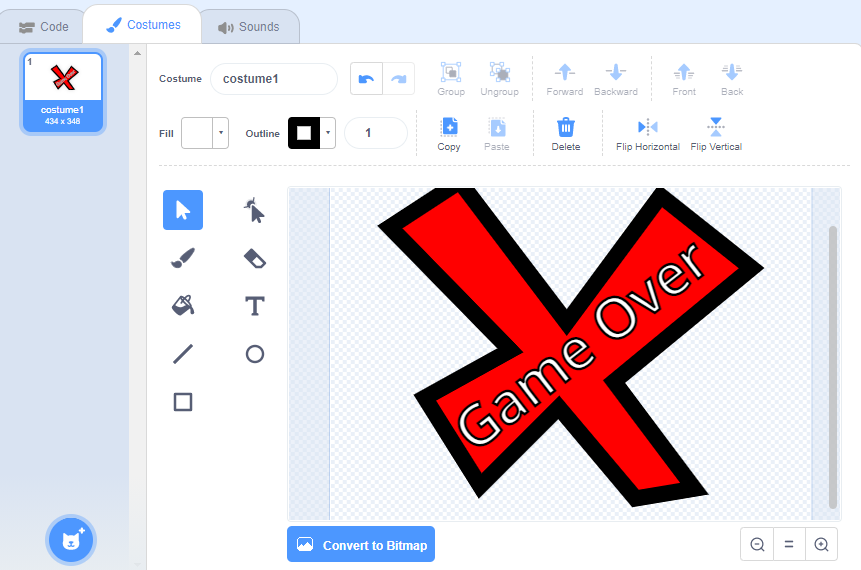
Step 2:Create the ‘add’ command
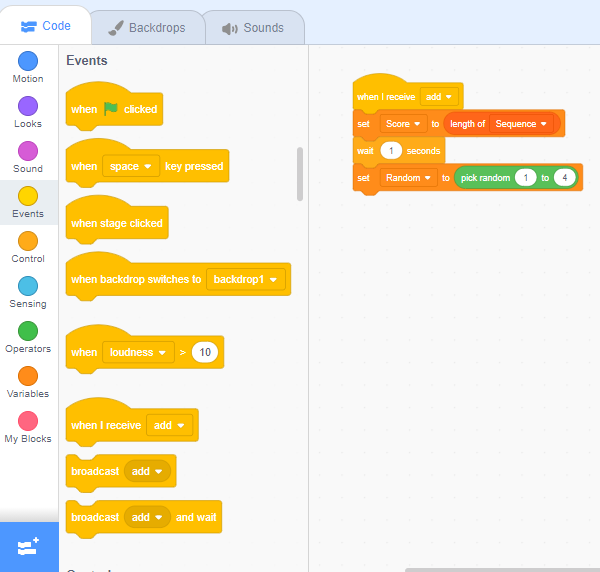
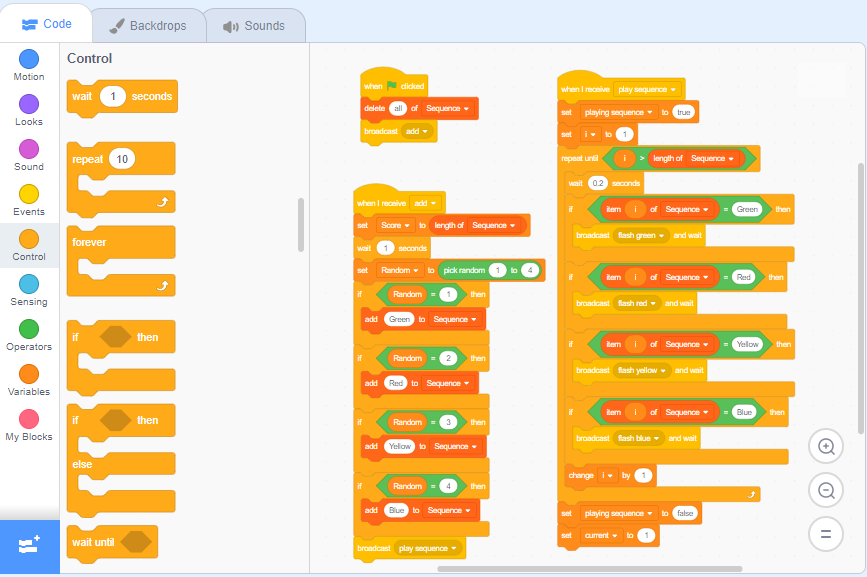
Once we've created our sprites, we can get onto creating our ‘add’ command. This command will be a part of the backdrop code. It will randomly select a colour, add it to the sequence, and flash it for the player to see. To to do this, we need to start by creating three variables: score, sequence, and random. Score will count the player’s score, sequence is the order of the colours, and random will choose a random colour to flash. We’ll start with a ‘when I receive add’ block, and then add blocks to set the score to the length of the sequence and select a random block. In the end, the code should look like this:
Now that we’ve done that, we can move on to defining what each number from 1-4 does. Each number will correspond to a colour and will add it to the sequence. In the end, the code will look like this:
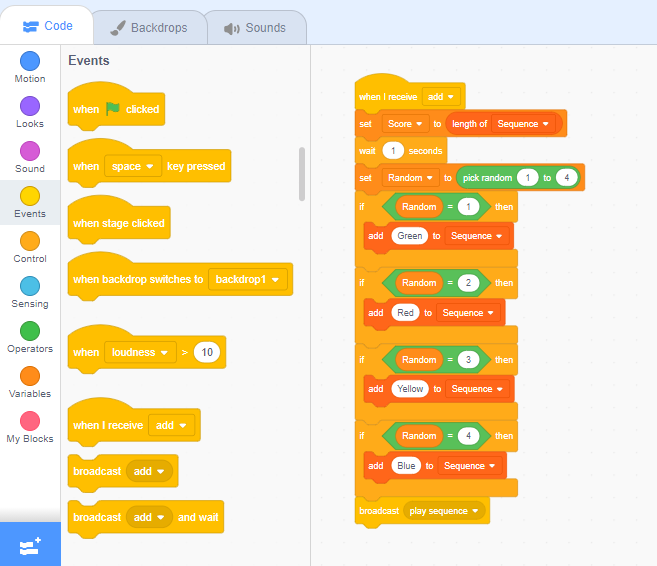
Hint: We’ve added a ‘broadcast play sequence’ block at the end. This is the command we’ll make in the next step.
Step 3: Create the ‘sequence’ command
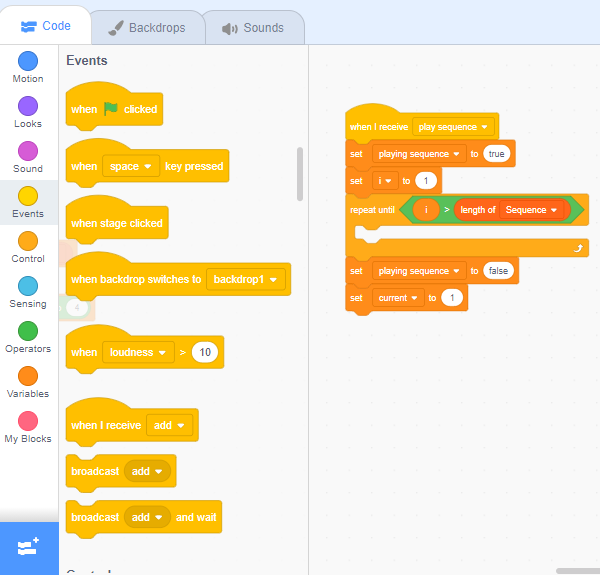
Now let’s move on to the play sequence command. We’ll start by dragging out our ‘when I receive play sequence’ block. Next, we’ll create two new variables: playing sequence and i. Playing sequence will control whether the tiles are flashing, and we’ll set it to true. Our ‘i’ variable will be used as a counter, so we’ll start by setting it to 1. Now, we’ll add a ‘repeat until’ block to repeat the sequence until i = length of sequence. Finally, we’ll set i to 1 and the playing sequence to false again.
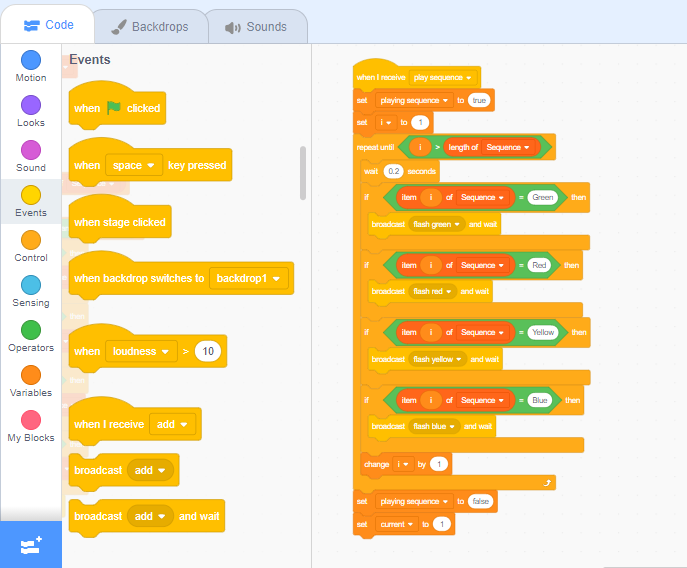
Now, all we need to do is make the colours flash. We need to create an if-statement that says “if item i of sequence = (colour): broadcast flash (colour)”. We will make one of these if-statements for each colour.
Hint: Add a wait 0.2 seconds command before the if statements, to space out the timing.
Finally, we’ll change i by 1 to make the loop run as many times as there are colours there are in the sequence. Once finished, the code will look like this:
Step 4: Add ‘if this sprite clicked’ code for each square
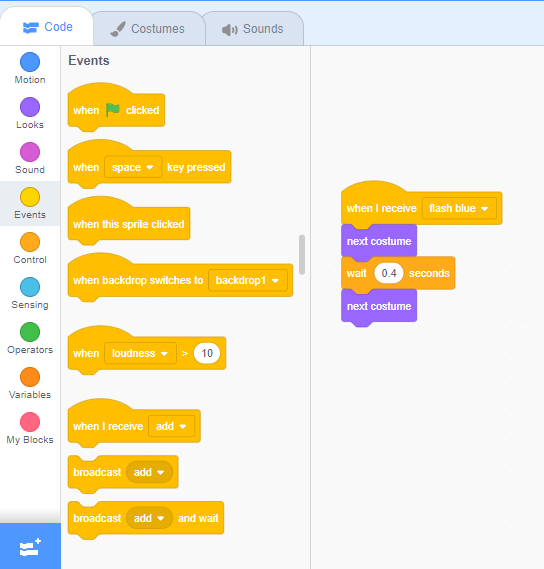
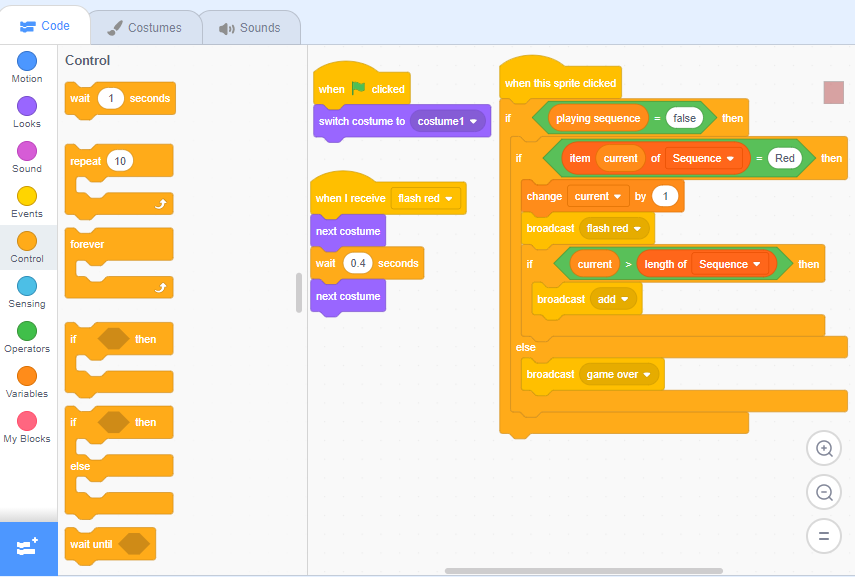
Remember how we added a block saying “broadcast flash (colour)” in the last step? Now we’ll define that command. To do this, we’ll just create a ‘when I receive flash (colour)’ block and add 3commands below it. We’ll switch to the next costume, wait 0.4 seconds, then switch back. The code will look like this:
Next, we’ll create the code to handle when the sprite is clicked. Start by bringing out a ‘when this sprite clicked block, and add an ‘if playing sequence = false’ block.
Hint: We only want to run this code if our ‘playing sequence’ variable is false, otherwise it won’t work.
Now to make the sprite flash if clicked. We’ll start by using an if-else statement to check if the current item of the sequence is equal to the tile’s colour.
Hint: We will need to create a ‘current; variable for this section of the code.
If so, we’ll change current by 1 and make the tile flash. We’ll also add another if-statement to check if current is less than the length of the sequence. If so, we’ll broadcast ‘add’.
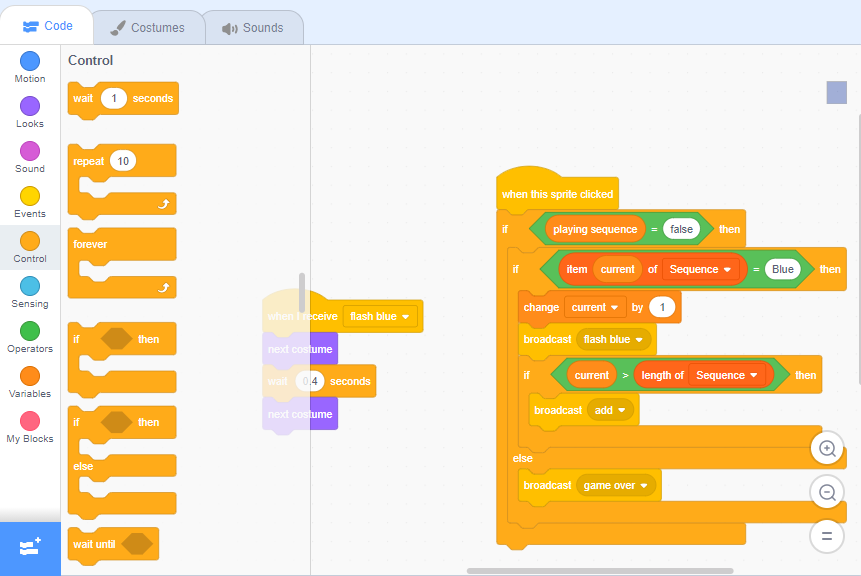
Hint: under the else section add a broadcast ‘gameover’ block. This will make it so that when the player clicks the wrong block the game will end.
Hint: We can copy the code from one sprite to another. Make sure to change the colour in the code to match whichever sprite we’re coding.
Step 5: Create the ‘when green flag clicked’ code
Next, we’ll need to create the lines of code to handle what each sprite does when the green flag button is pressed. For the backdrop, we’ll drag out a ‘when green flag clicked’ block, and make the program delete the sequence and broadcast ‘add’. When we’re done it will look like this:
Now to make the green flag code for the coloured tiles. We’ll bring out the same green flag block, then we’ll set the costume to costume 1. This code will be the same for all four tiles.
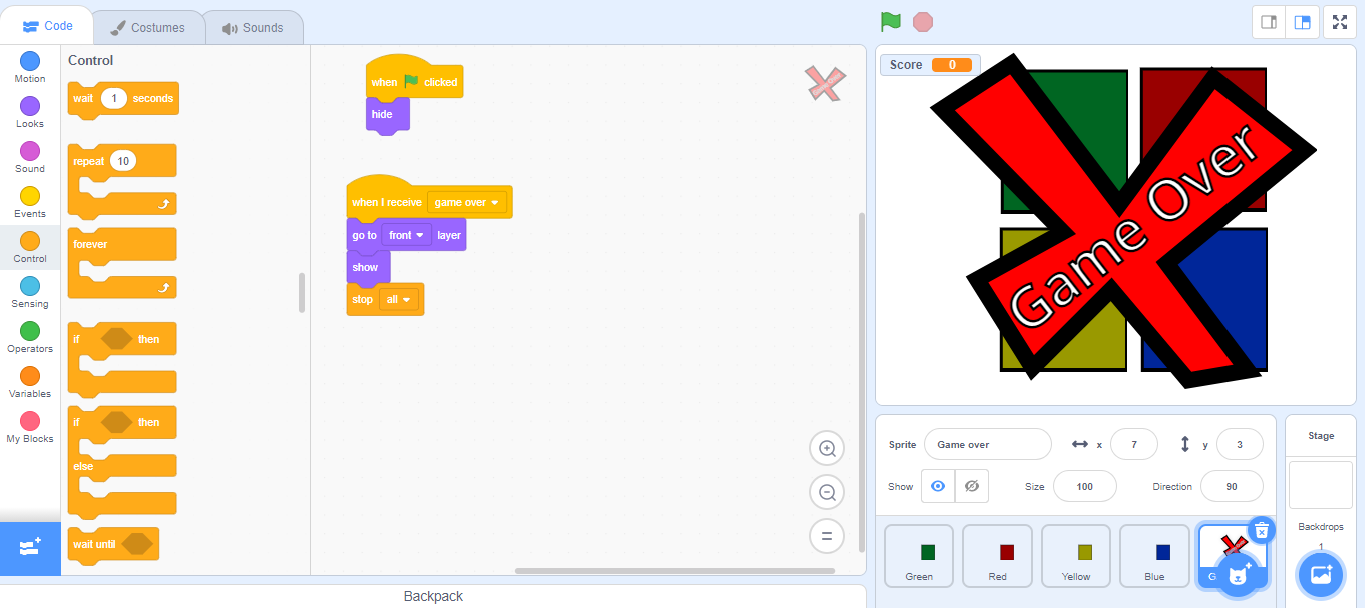
Lastly, we need to write the starting code for our game over sprite. This is the most simple line of code: we’ll hide the sprite when the green flag is clicked.

Step 6:Create Final Game Commands
Finally, we need to code the rest of the game over the sprite. To do this, we’ll start by bringing out a ‘when I receive game over’ block. Under this, we will bring the sprite to the front, show it, and stop running all the code. In the end, it will look like this:
Project Complete!
And now we’re done! Feel free to test your game and see how it works. If you’re stuck or have any issues with your code, try reviewing it to see if you’ve made any mistakes, or check out the code mentioned above as a reference.
Keep Learning: Scratch Coding for Kids
Geekedu offers Scratch coding for kids that teaches beginners fundamentals in coding by making games. Outside of Scratch, we also teach coding courses for kids 8-18 in a variety of languages like Python, Java, C++, Animation and more.
Check out our online courses for kids, or contact our admissions team to learn which course is best for your student!

.png)


