Who is this Project For?
This is an advanced-level Scratch project. Before beginning, you should already know how to use variables, if-statements, operators, and broadcasting. These will be the main concepts used in this project.
What Will We Learn?
This project focuses on using knowledge of Scratch components like operators, variables, lists, and broadcasting. By the end of the project, you will be able to use these concepts to create a simple game.
Features to Consider:
- The game should start with one of the players placing their X or O.
- The players will alternate turns until someone wins or the whole grid is full.
- Players win by getting 3 of their symbols in a row, either horizontally, vertically, or diagonally.
- If neither player wins the game is a draw.
- When the game is over the player can press the spacebar and the game restarts.
Main Steps:
This project has 4 main steps:
- Create the sprites
- Create the main grid code
- Define the “Winner” function
- Create the code for the X and O symbols
Step 1: Create the sprites
To begin, we need to make the sprites for the game. We will have 2 sprites: one that will act as the grid and one to be the X and O symbols. Let’s start with the symbol sprite. We will need to start by making three costumes. One will be a plain shape the same colour as the backdrop, one will be an X, and one will be an O.
Hint: The blank shape will serve as a blank section on the grid before an X or O is placed. Here is an example of what the costumes would look like in the end:
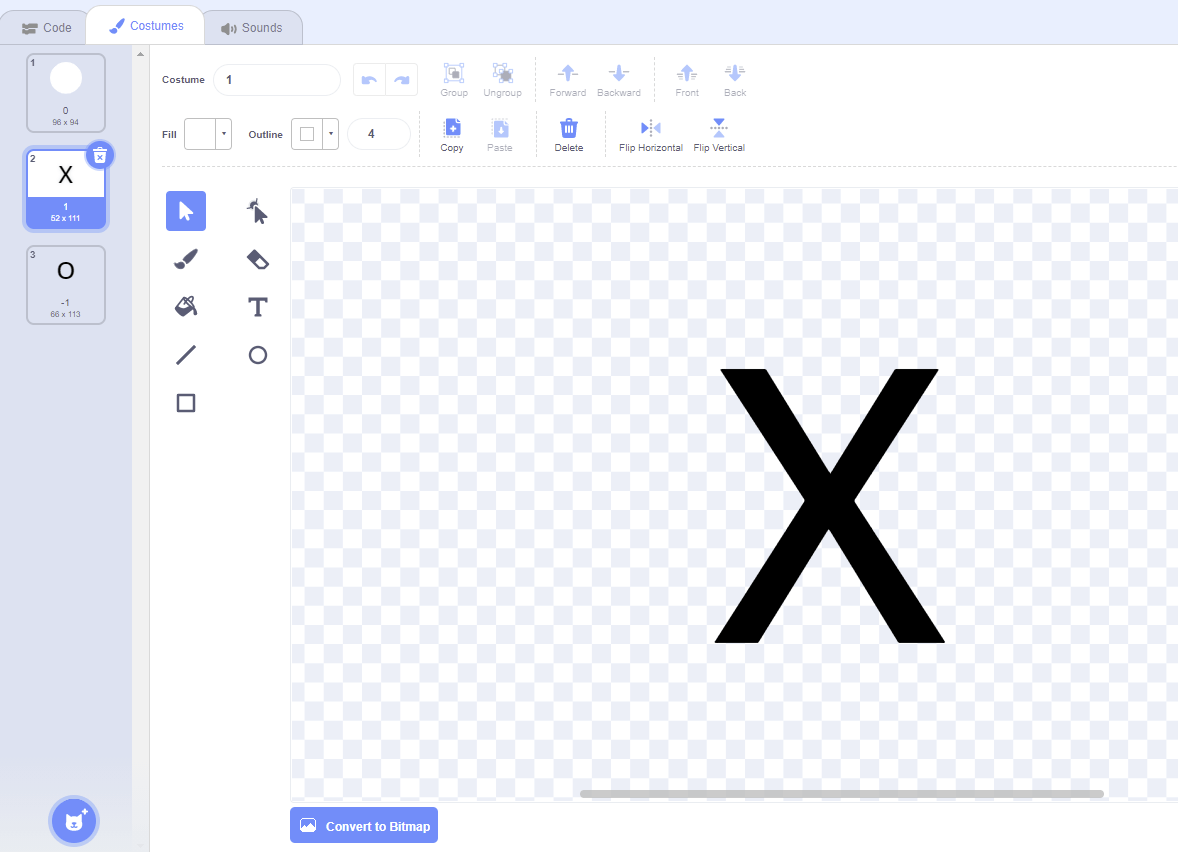
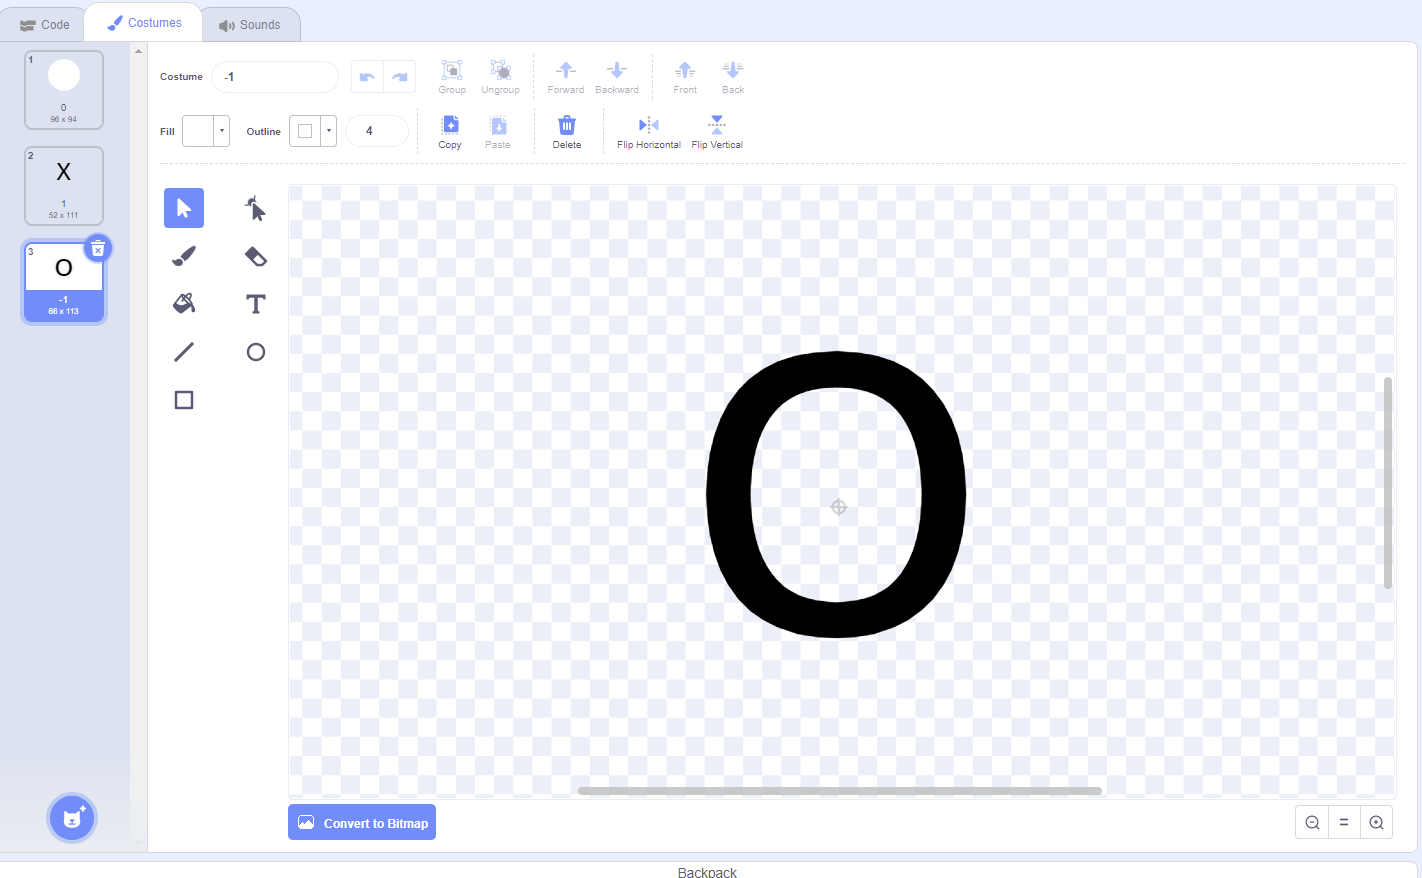
Hint: Notice how the costumes have been labelled 0, 1, and -1. This will allow us to use operators and variables to switch between costumes.
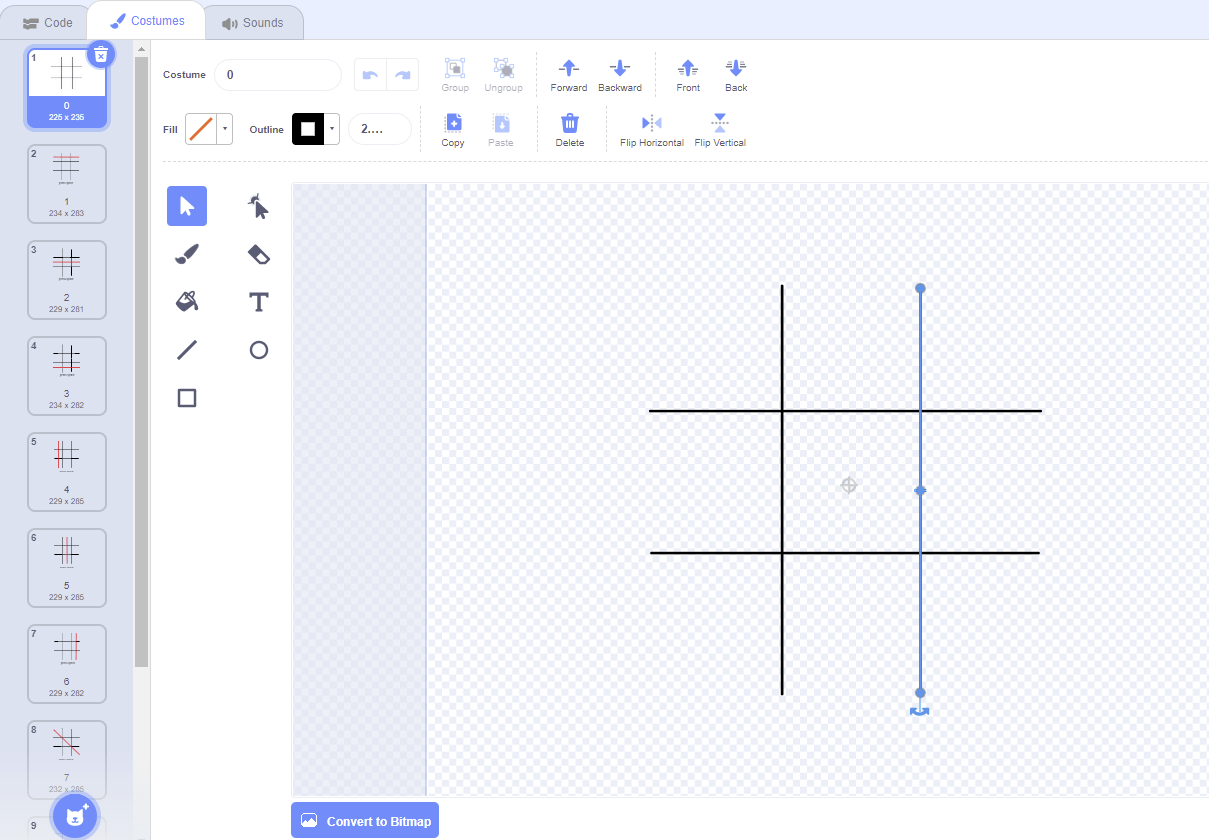
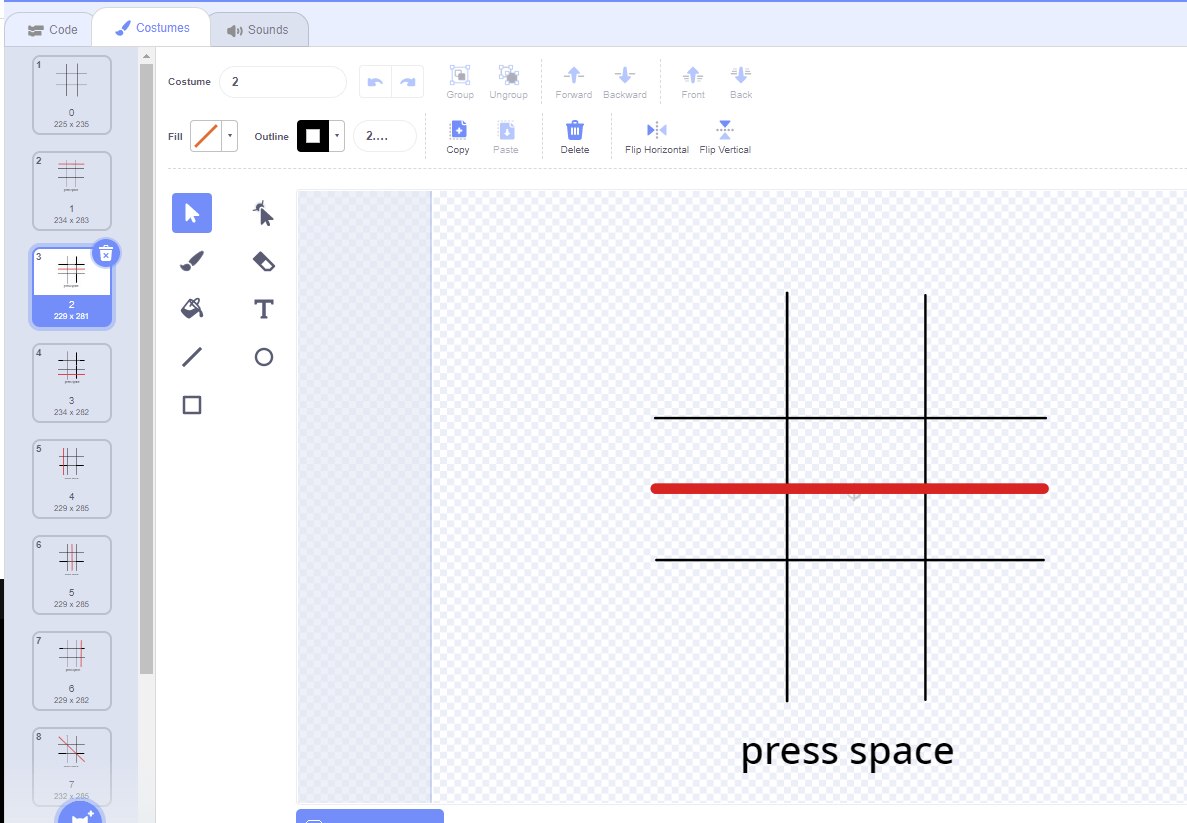
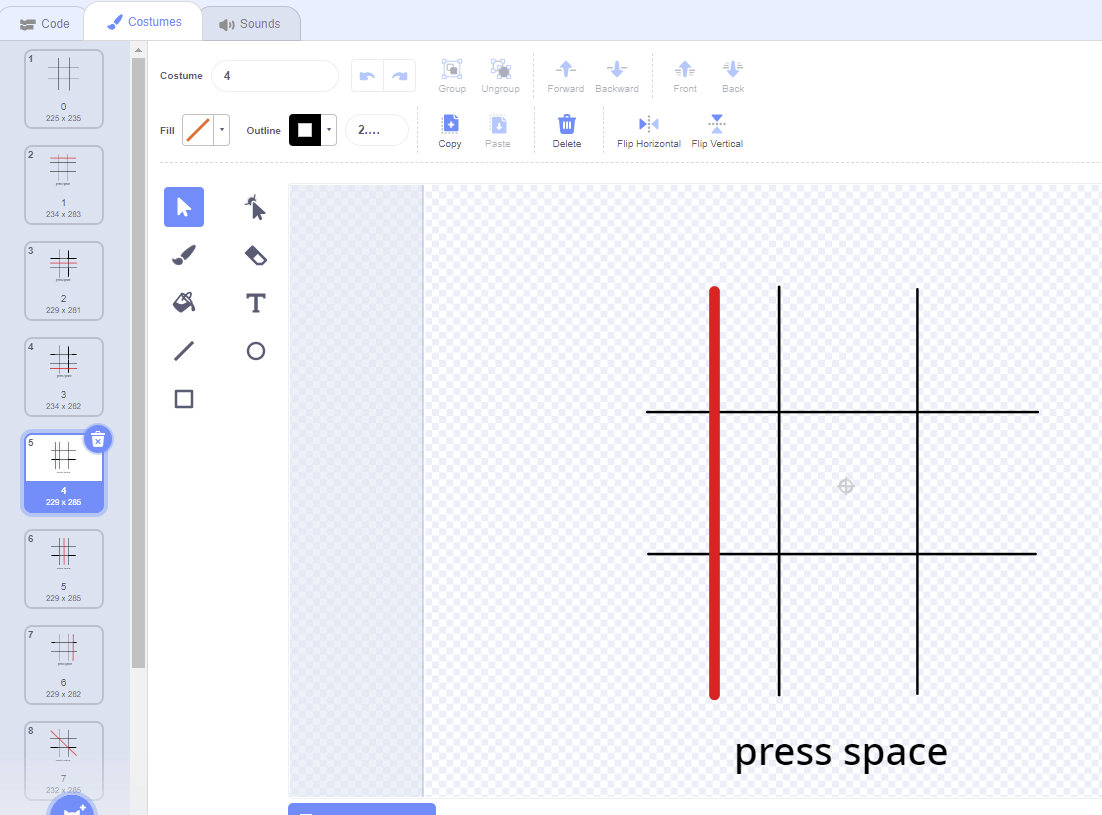
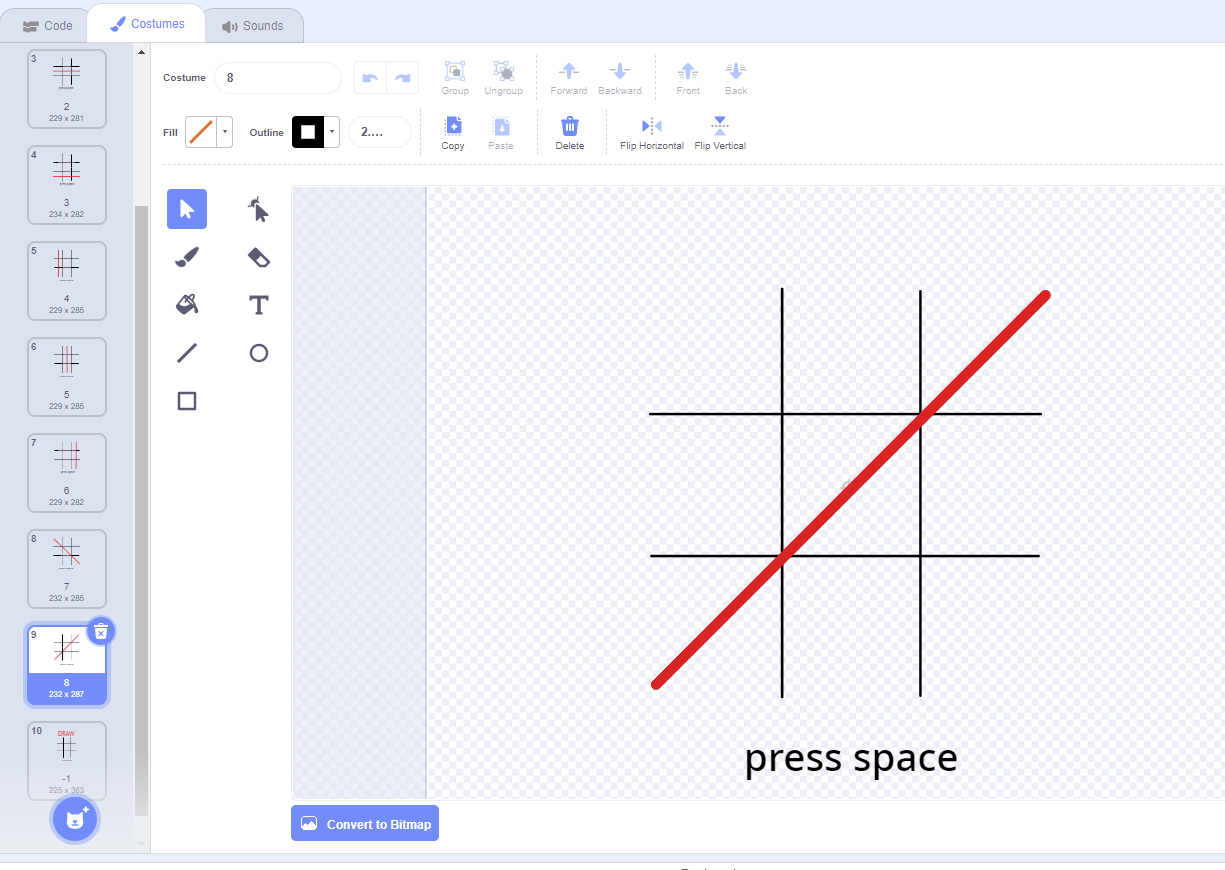
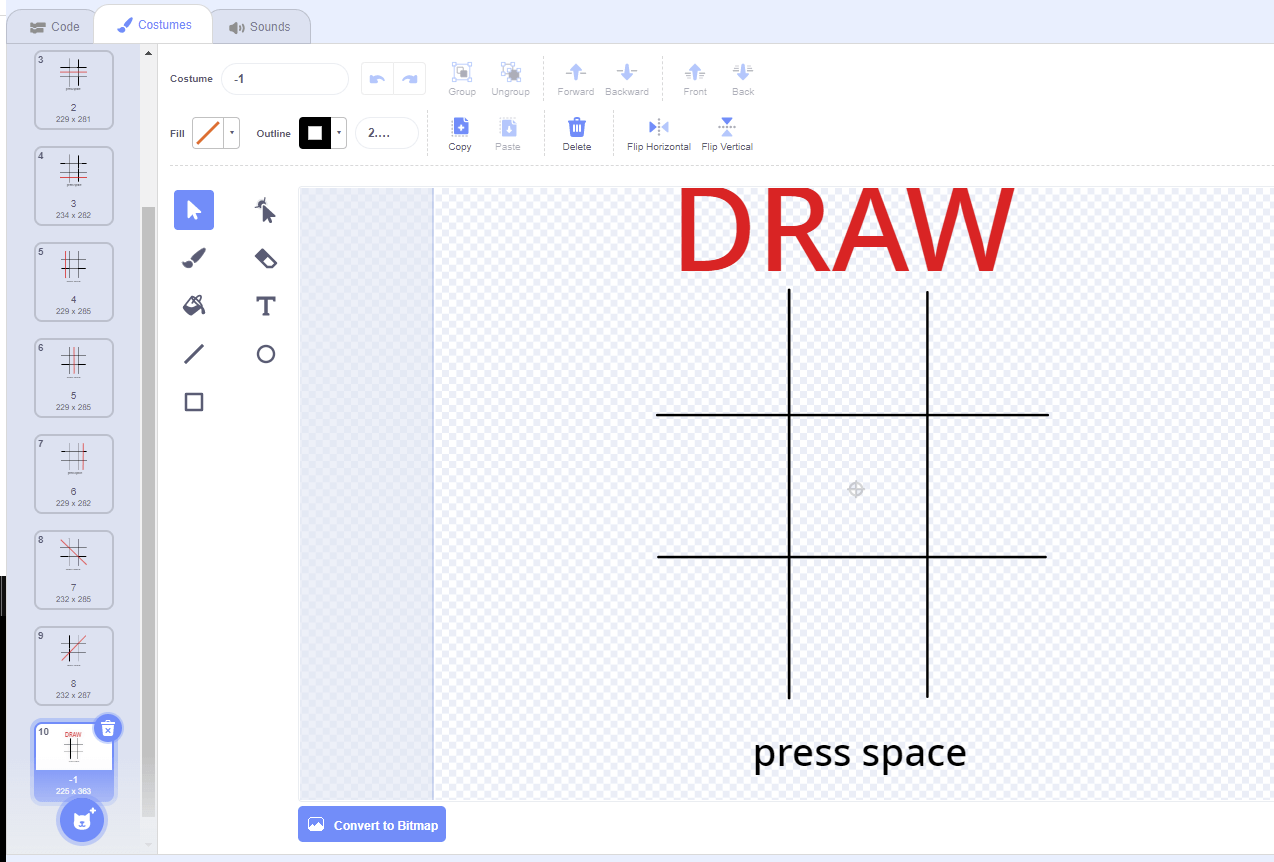
Next, it’s time to create the grid costumes. We will need a total of 10 costumes, labelled from -1 to 8. The costumes we will need to create include:
- Blank grid
- Grid with horizontal win
- Grid with vertical win
- Grid with diagonal win
- Draw grid (for when neither player wins)
These costumes will change once the game is over to show who won. Like the symbol sprite, the costumes are labelled with numbers to make it easier to change between costumes efficiently. The finished costumes will look like this:
Step 2: Create the main grid code
Now that the sprites and their costumes have been made, it’s time to start on the code for the grid sprite. Start by taking a green flag block and underneath broadcast a clear message. This message will change the grid sprite to costume 0, which is the clear grid. Next, we’ll grab a “when I receive” block and select our clear message. Underneath, we’ll make three variables: moves, gameover, and player.
Hint: The moves variable will control how many turns until the game is over and gameover will determine what costume to show when the game is over(who won the game). The player variable determines which player gets to place their symbol.
Set the moves variable to 9, the gameover variable to 0, and the player variable to 1. Next, we will create a list called cells, and delete all the values in it. Finally, we will switch the sprite’s costume to 0 and show the sprite. Next, It’s time to define what happens when the spacebar is pressed. We want this to clear the grid for the next game. To do this we will grab a “when space key pressed” block, and underneath add an if statement. This will check to see if gameover is not 0, and if so, it will broadcast a clear message.
Hint: Remember that if gameover = 0 the grid will be blank anyways, so we will not need to broadcast the clear message. At this point the code will look like this:

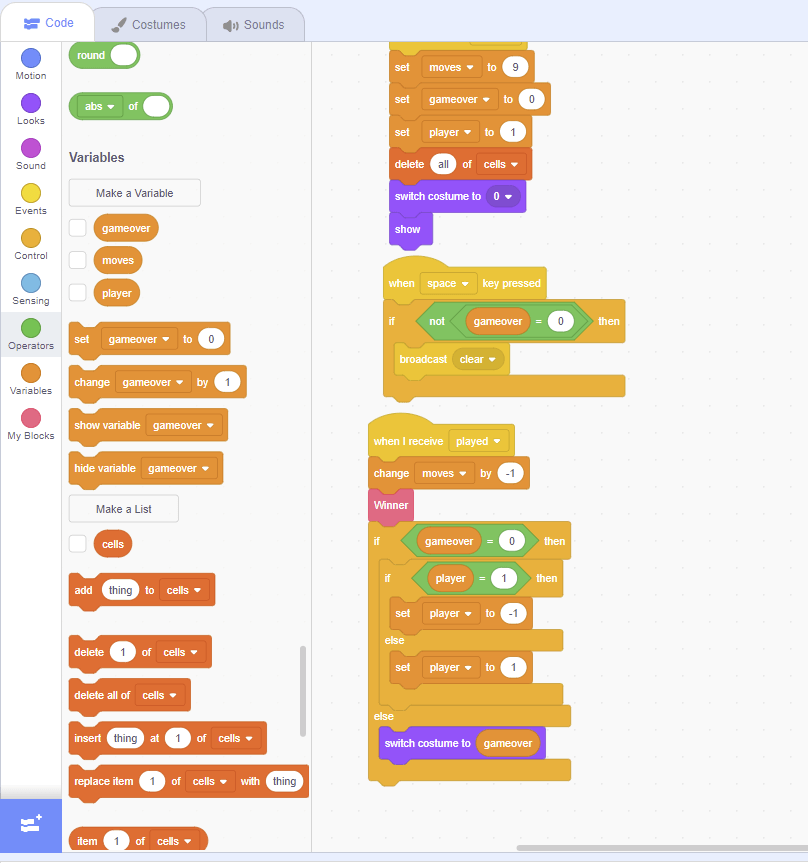
Finally, we need to create and define our “played” message. This message will indicate that one player has taken a turn and it’s time for the next player to move. Start by using a “when I receive” block and creating a message called played. Next, we will change the moves variable by -1 to count down until the game is over. Underneath this, we will create a custom block and title it “Winner”.
This will be defined later and will let us know which player has won the game.
Hint: Custom blocks in scratch are also known as functions. They allow us to use a repeating block of code without having to type it out each time.
Now we need to add two if-else statements, one inside of the other. The first one will check if gameover is 0, and if so it will run the second if-statement. If the player = player 1, then the game will set the player variable to -1, otherwise, it will set the plate to 1. This will make the game
alternate between players. In the final if-statement, we will change the costume to the gameover value. In the end, the code will look like this:
Step 3: Define the “Winner” function
Now that the main code for the grid sprite is complete, it’s time to define the custom block we’ve created. In the end, this code block will check to see which symbols are in which section of the grid. It will select the proper background once the game is over to show which player won. Start by using the define winner block and underneath, add an if-statement. We then need to create a list called “cells”, which will keep track of where on the grid each symbol is. Next, we need to use operators to check if item 1 of cells = player, and if item 2 =plate, and if item 3 = player. If so, we will set the gameover variable to 1.
Hint: This will check if all of the cells in the top row belong to the same player. If so, the backdrop will change to one with the red line over those cells to indicate that a player has won.
After this step, the code will look like this:
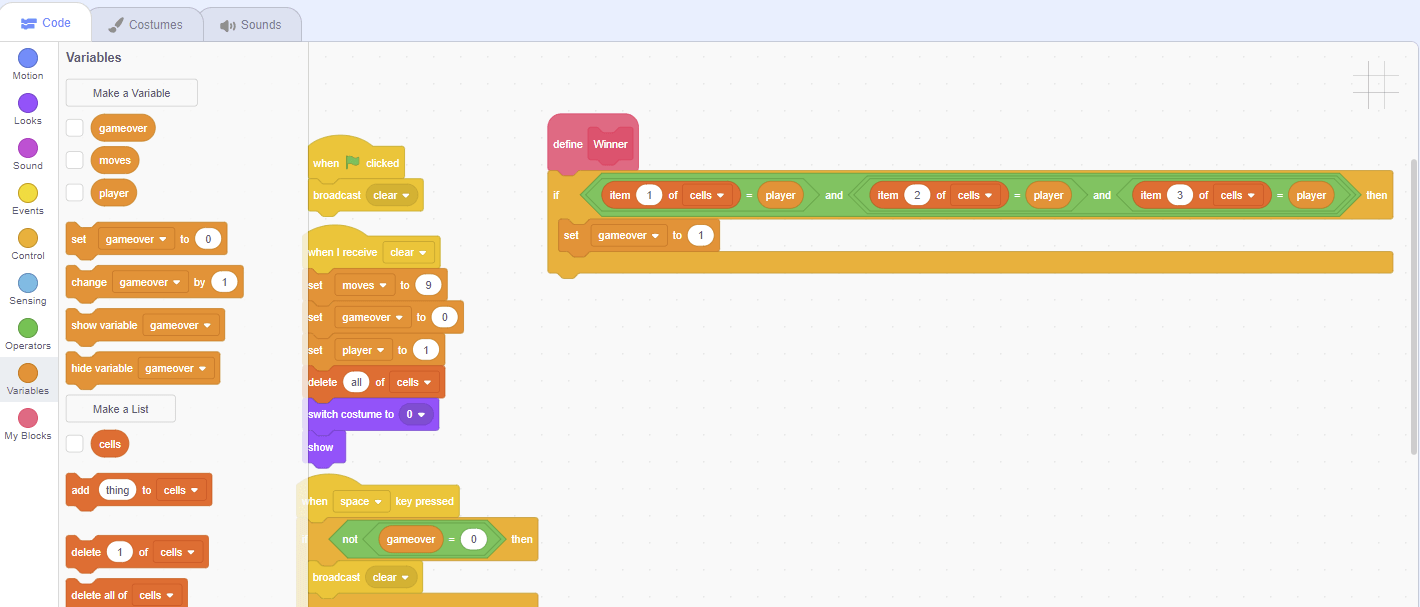
Now we will need to make the other combinations. To do this, duplicate the if statement and simply change the numbers inside the operator statement and the gameover value. The other cell combinations for the operators are:
- Horizontal:(4, 5, 6), (7, 8, 9)
- Vertical: (1, 4, 7), (2, 5, 8), (3, 6, 9)
- Diagonal: (1, 5, 9), (3, 5, 7)
Hint: Remember to make the gameover value bigger by 1 each time. Once this is done, the code will be:
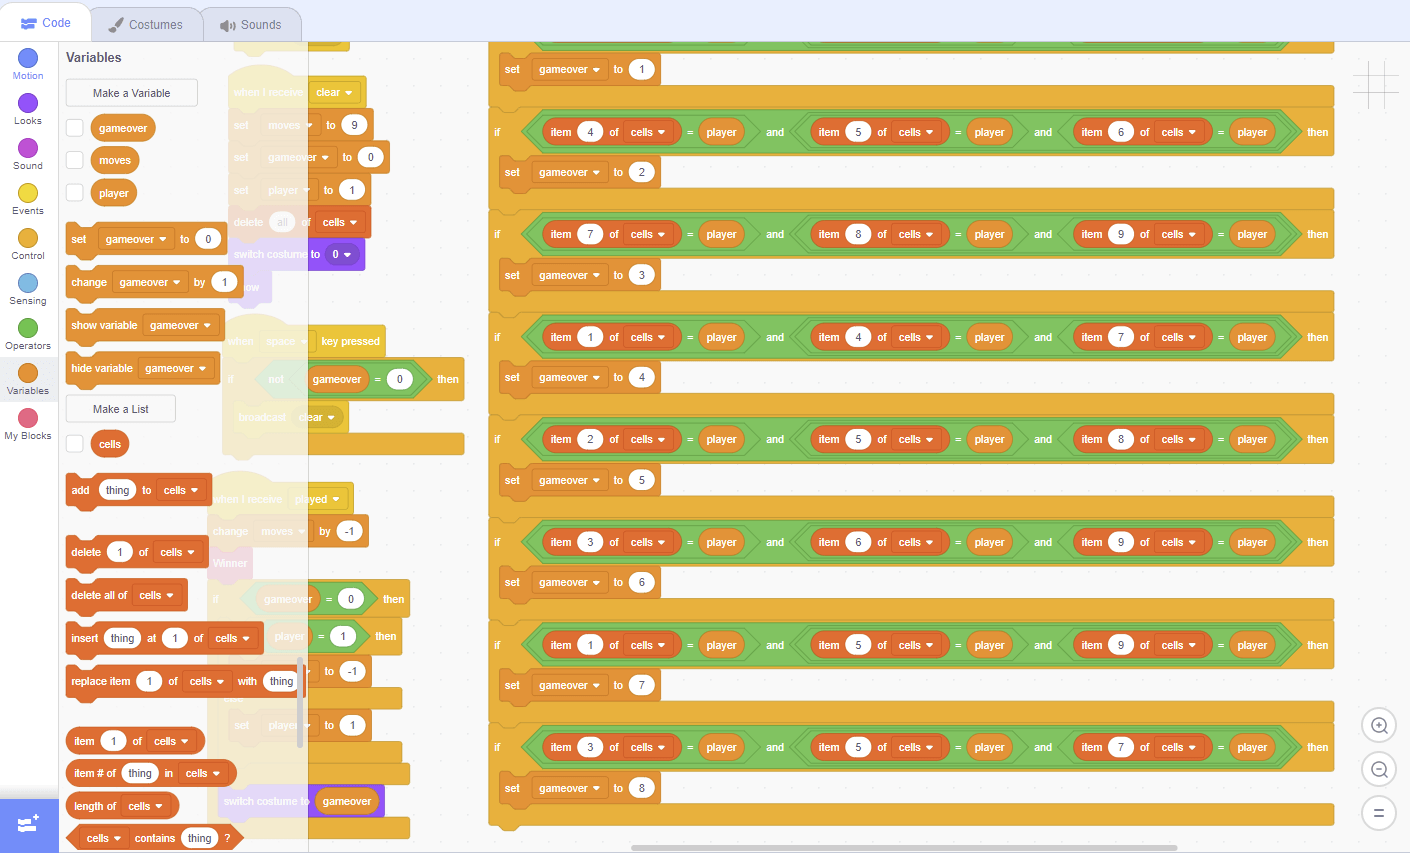
Next, we’ll need to add the code to check if the game is a draw. To do this, add two if-statements with one inside the other. In the first one, check if gameover is 0.Then, check if moves are equal to 0 as well. If so, wet gameover to -1, which will display the costume for when the game is a draw.
At the end of this step, the code will look like this:

Step 4: Create the code for the X and O symbols
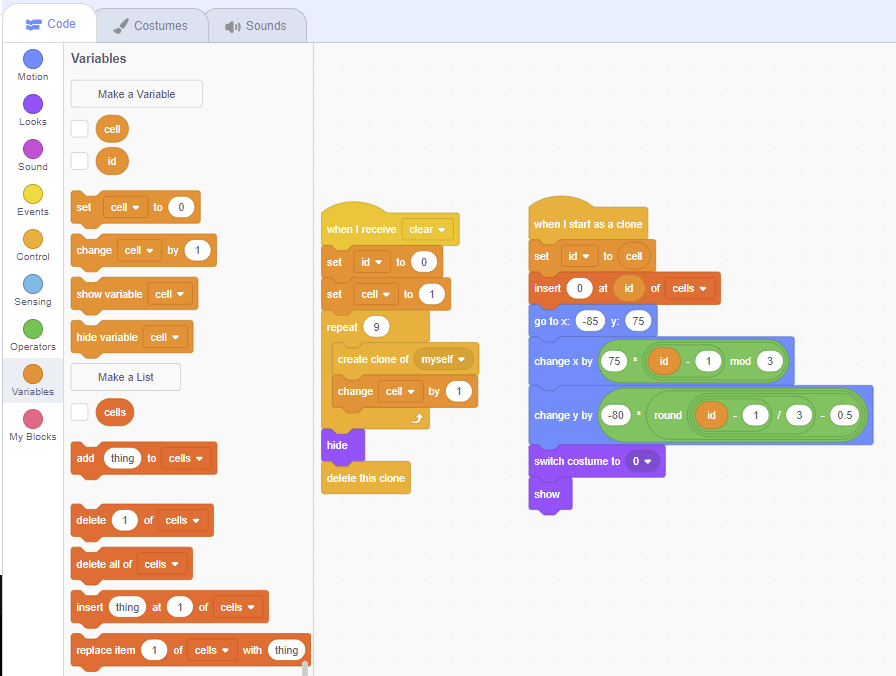
Now that all of the code for the grid sprite is complete, it’s time to code the symbol sprite. Start by bringing outa “when I receive clear” block. Underneath, we will create a new variable called “id” and set it to 0. We will also create a variable called “cell” and set this to 1.
Hint: Notice that the “cell” variable and the “cells” list are different from one another!
Next, we will use a repeat loop and choose to repeat the loop 9 times. Inside, create a close of the sprite and change the cell by 1. This will create a new symbol sprite for each cell in the grid.
Finally, hide the sprite and delete the clone. Next, it’s time to code what happens when the new clone is created. Start by taking a “when I start as a clone” block and underneath change the id value to the cell value. Next, choose a block to insert 0 at the id of the cells list. We will also need to make the clone go to (-85, 75), then change the X coordinate by 75 times the id - 1, mod 3. Next, change the Y coordinate by -80 times the rounded version of (id-1 divided by 3, minus 0.5). This will ensure that the symbols are inserted in the proper locations.
Hint: These operations will change depending on where the grid sprite is and how large it is. Make sure to find an equation that will accurately place the symbols according to your sprites and grid location.
Now, we just need to set the costume to 0 (this is the blank costume) and show the sprite. Once complete, the code will look like this:
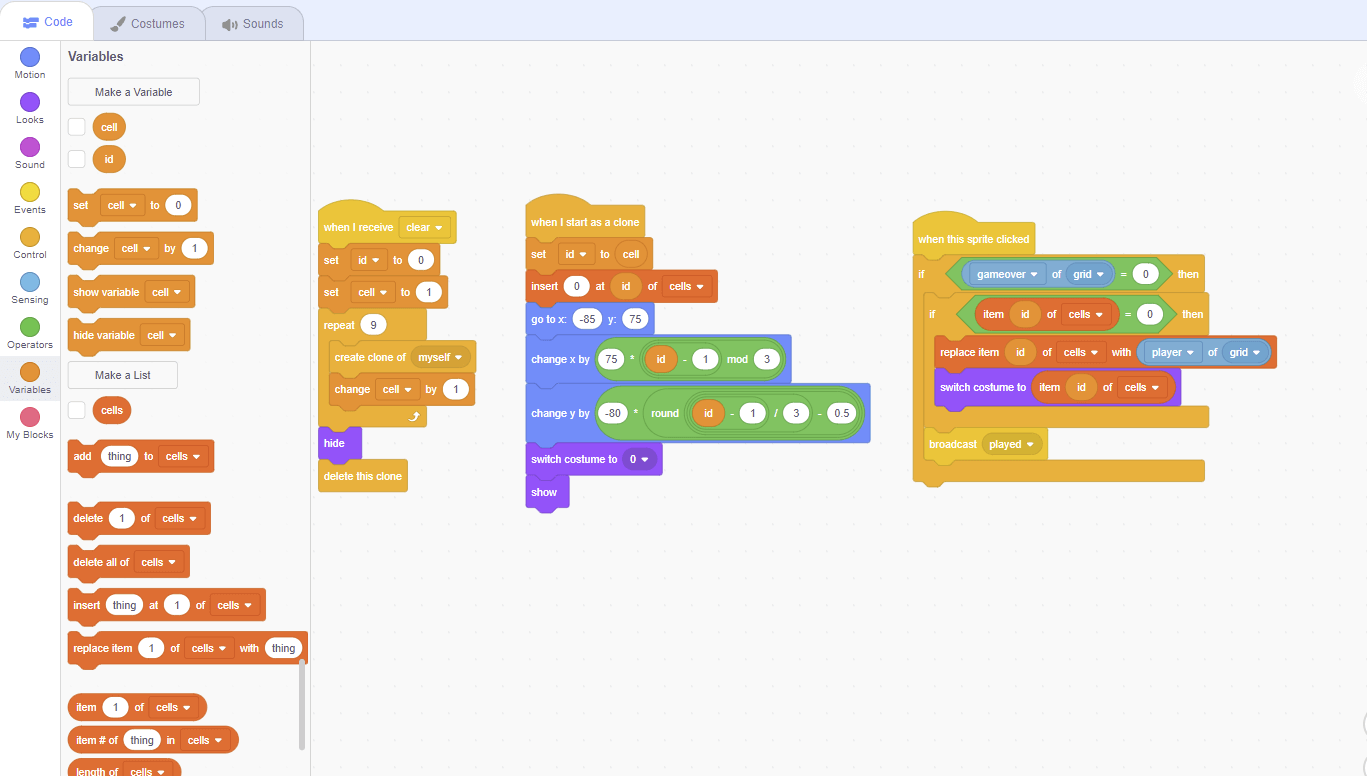
Now we just need to define what will happen when the sprite is pressed. In this case, we want the sprite to change costume to whatever player’s turn it is. Start by checking if the "gameover b= variabe l "of the grid sprite is equal to 0. If so, then use another if-statement to check if the item “id” of the cells list is equal to 0.If so, the player will be able to place their symbol there. Next, replace the item id in the cells list with the player number of the grid sprite. This will ensure that the correct player’s symbol is inserted. Then, switch the consumer to the item id of the cells list. This will change the costume to either an X or an O, depending on what layer placed it. Finally, outside of the second if-statement but inside the first, broadcast the played message. This will indicate that one player has had their turn and the code will make sure it is the next player’s turn. Once complete, the code will be:
Project Complete!
And now we’re done! Feel free to test your game and see how it works. If you’re stuck or have any issues with your code, try reviewing it to see if you’ve made any mistakes, or check out the code shown above as a reference.
Keep Learning: Scratch Coding for Kids
Geekedu offers Scratch coding for kids that teaches beginners fundamentals in coding by making games. Outside of Scratch, we also teach coding courses for kids 8-18 in a variety of languages like Python, Java, C++, Animation and more.
Check out our online courses for kids, or contact our admissions team to learn which course is best for your student!

.png)


