Introduction:
In this lesson, we are going to be creating a simple choose your own adventure game using Scratch. This is a great project for those who already have some Scratch experience and want to challenge themselves by trying something new. It will allow players to make choices to control what a character does, but be careful, because each choice affects the outcome of the story!
Who is this Project For?
This is a beginner-level project for those who are new to Scratch. Before beginning, you should already know how to use sprite costumes and broadcasting. These will be the core concepts used in this project.
What Will We Learn?
This project focuses on using knowledge of Scratch components like broadcasting and changing costumes and backdrops. By the end of the project, you will be able to use these concepts to create a simple story game.
Features to Consider:
- Players can make choices to control what the character does
- Each choice will affect the outcome of the game
- The player will have multiple choices to choose from
- There will be a minigame within the story to keep players interested
Main Steps:
This project has 5 main steps:
- Plan out the story
- Create the sprites and backdrop
- Code the button sprites and backdrop
- Code the side characters
- Code the player sprite
Step 1: Plan out the story
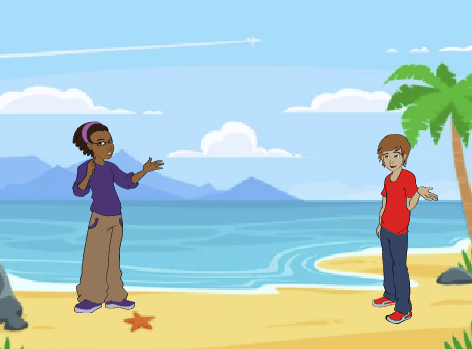
Because this game includes creating a story for players to interact with, it is important to begin by planning out what the story will be about. This will give you an idea of what types of sprites you will need to create, as well as how you will create the game. For this example, we will be creating a story about a girl named Avery and the crazy day she experiences. She will be able to go to the beach or hike in the woods, and along the way will meet her friend Jack, as well as a bear in the woods. Her reaction to these problems will control how the story goes. For your story, feel free to come up with your own creative idea, and adjust the sprites and backdrops that you use accordingly.
Step 2: Create the sprites and backdrop
Once you have an idea of what you want the story to be like, it’s time to begin creating the sprites.
Hint: For this game, I will need 9 sprites: One to act as the main character, one for Avery’s friend Jack, a bear sprite, and 6 buttons that the player will use to make decisions.
For Avery and her friend Jack, we will use some people sprites from the Scratch sprite library, and for the bear, we will use the bear sprite.
The buttons will make use of more of the button sprites from the sprite library, although any sprite would work as a button if needed. On each button, we will write the options the player has to pick from. For this example, we will have buttons for:
- Go to the beach
- Go hiking
- Run away from the bear
- Freeze next to the bear
- Go home
Hint: We will be duplicating the beach button because it is needed twice, so there will only be 5 different messages to type.
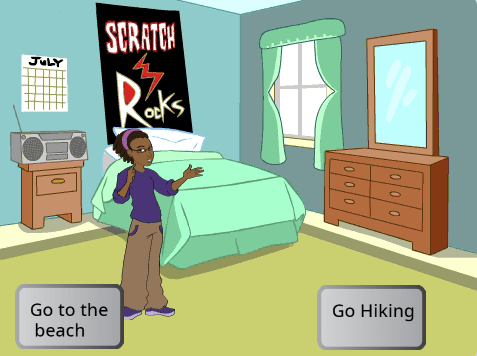
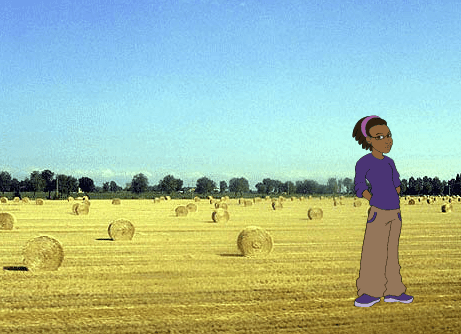
Now that the sprites have been chosen, it’s time to choose the backdrops. We will need backdrops for Avery’s room, the beach, the forest, a hayfield, and the end-of-game screen. The first four backdrops can be found in Scratch’s backdrop library. Alternatively, if you want to upload your own backdrop you can do that as well by uploading an image from your computer.
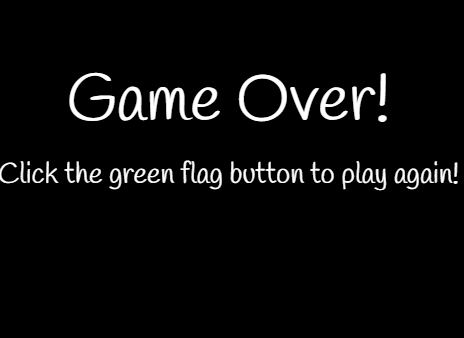
For the end-of-game screen, we will need to create a backdrop. You can do this by going to backdrop costumes and using the paint tool to create a backdrop and add text. For this example, we have created a black backdrop that says “Game Over! Click the green flag button to play again!”. In the end, the backdrop should look like this:
Step 3: Code the button sprites and backdrop
Next, it’s time to code the button sprites and the backdrop. For the buttons, we will code them so that when clicked they trigger the next section of the story. Todo this, we will start by choosing a “When this sprite clicked” block, and underneath we will change the costume to costume 2.
Hint: The buttons have 2 costumes each so that when they are clicked they change colour for a very short amount of time before changing back
Next, the code will wait 0.3seconds before changing back to costume 1. Next, we will create a new message for whatever button we create (In this case it was the beach option so we have created a message called “beach”). Finally, we will create another message to hide the buttons, and then we’ll hide the sprite. For the next part, we will make sure that the button hides when the green flag is clicked and when it receives the “hide buttons” message. You can do this using the yellow event blocks from the events category as well as the purple hide block. The last thing you will need to add for the buttons is to make them show when it’s time to make a choice. Start by creating a message called “Choice 1”. This will be broadcasted when it’s time to make the first decision. When this message is broadcasted, the sprite will go to the front layer and show itself. Once these steps are complete, the code should look like this:

The same code can be duplicated for the run and freeze buttons, as well as the second beach button. However, for the run and freeze buttons, it is important to make sure that you change the message they broadcast, as well as when they show themselves. For example, the freeze button would look something like this:
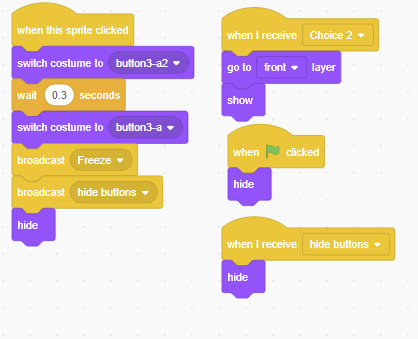
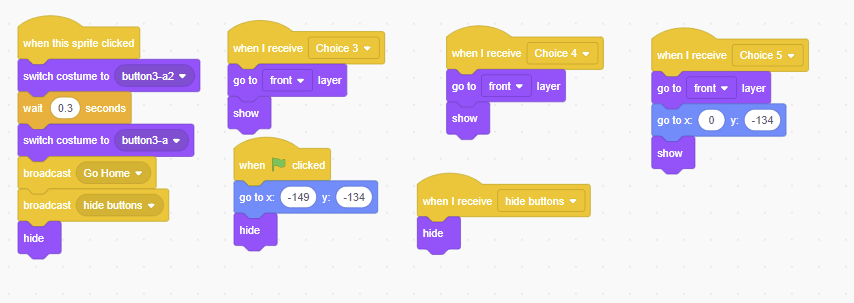
Now, it’s time to create the hiking and go home buttons. The hiking button is the same as the other buttons, except we will create another sequence of code to make itself show when it’s time for choice 4 as well as choice 1. Other than that change, the code is the same. The go home button, however, is slightly different. The “when sprite clicked” code is the same, but it will show itself when it receives the messages for choices 3, 4, and 5. Additionally, when the green flag is pressed, it will go to (-149, -134) before showing itself, and when it receives choice 5, it will go to (0, -134).
Hint: This makes it so that the button is to one side when there are two options, but when going home is the only option the button will be centered on the screen.
Once the code for this section is complete, it should look like this and it’s time to code the backdrop:
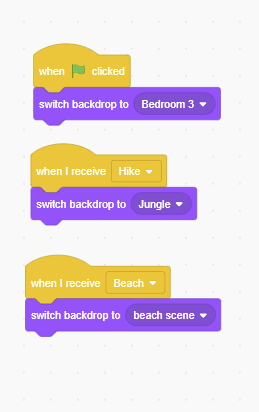
Now, the code for the backdrop is very simple. We will need three event blocks: one ‘when green flag clicked”, and 2 “when I receive” blocks. When the green flag is clicked, the backdrop should be set to the bedroom, and when the hike and beach messages are received, the backdrop should switch to forest and beach scenes respectively. Once the backdrop code is complete, it should look like this:
Step 4: Code the side characters
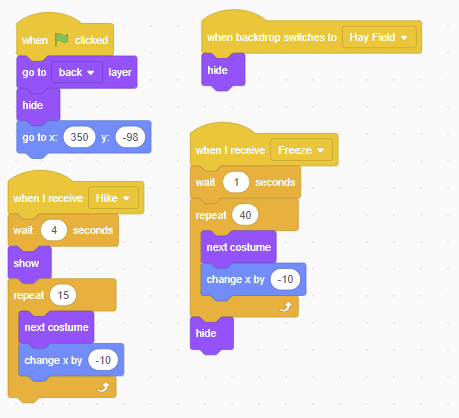
Now that the buttons and backdrop have been coded, it’s time to create the code for the bear and Jack’s sprite. The code for the bear is very simple. Start by taking a “When green flag clicked” block, and dragging it into the workspace. Underneath, set the sprite to the back layer and hide it. Then, make it go to(350, -98) so that it is in a position to show itself later. This position could be different, it depends on where you want the bear to come from. Then, grab two “when I receive” blocks. When the sprite receives the hike message, it should wait 4 seconds, show itself, then run towards Avery. To do this, we can use a repeat loop to repeat the same blocks of code 15 times.
Inside the loop, make the bear change to the next costume and change x by -10. This will make the bear appear to run at the other character. When the freeze message is received, the bear should wait 1 second, before repeating the same running loop 40 times and then hiding. Finally, the last code section to make should hide the sprite when the backdrop is switched to the hayfield. Once the bear’s code is complete, the code should look like this:
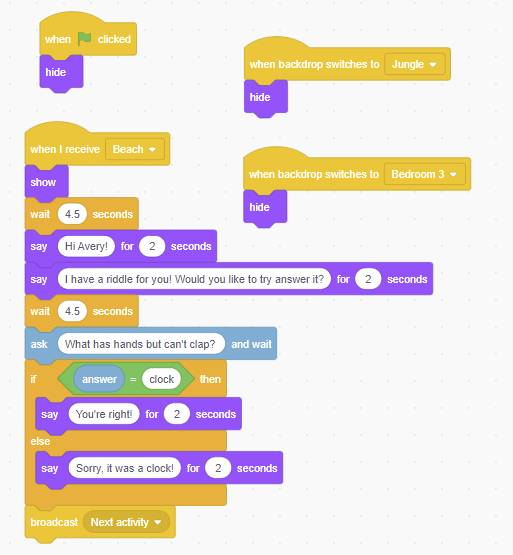
Next, it’s time to move on and code Jack’s sprite. This spite will be a bit more complex as it has the code for a mini-game. To begin, we’ll bring out event blocks to hide the sprite when the green flag is pressed, or when the backdrop changes to the forest or the bedroom. This will ensure that the sprite is only visible when necessary. Next, it’s time to code a small game- a riddle guesser. The sprite will ask a question and wait for the player to guess the answer. To do this, we will start by having the character show itself when it receives the beach message. Next, it will wait 4.5 seconds before greeting the character and explaining the game. After another 4.5 second pause, the character will ask a question. Use the “ask and wait” block from the sensing section to ask the riddle question. Hint: In this case, the question is “what has hands but can’t clap” and the answer will be “a clock”. Next, we need to add an if-statement to check if the answer is correct. Take an if-statement from the control section, and inside use the equals operator to compare the player’s answer to the correct answer. If they are the same, use a say block to make Jack say “You’re right!”. If the player is wrong, Jack will say “Sorry, it was a clock!”. Finally, after this is done, use a broadcast block to create a new message called Next Activity. This will run and signal to the other sprites that it’s time to move on. Once this is complete, the code for this sprite is complete, and it should look like this:
Step 5: Code the player sprite
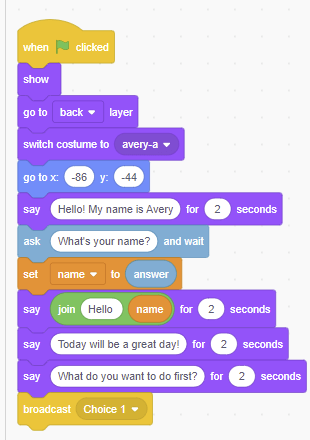
Finally, it’s time to code the last sprite– the player sprite. This sprite has 7 large sections of code, but they all use very similar concepts. This will make it much easier than you expect, so let’s get started! You’ll want to start by dragging out a “when green flag clicked” block, and underneath, show the sprite and send it to the back. This will make sure that she does not overlap with the buttons later on. Next, switch the costume to the one titled “Avery-a” This is a pose where the character stands and talks to the player. Next, the Character will introduce herself as Avery, and ask the player’s name. To do this, you can use a say block, and then an ask block from the sensing category to ask the player’s name.
Hint: When using a say block, make sure to use a time of 2-5 seconds to give players time to read the sentence!
Next, we will create a new variable called “name” and set it equal to the player’s input. This name can later be used in sentences throughout the game. Now that that’s done, we will use the name in a sentence by joining “Hello” and name inside of a say block.
Hint: Make sure to add a space after the message so that the name and last word of the sentence aren’t simply squished together.
Finally, use a say block to ask the player what they want to do, then broadcast the Choice 1 message to show the player’s options. After you’ve finished this section, the code should look something like this:
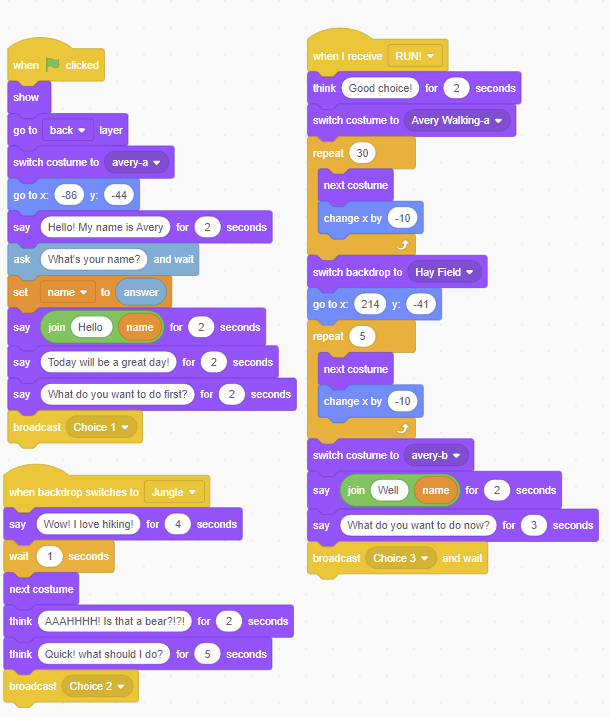
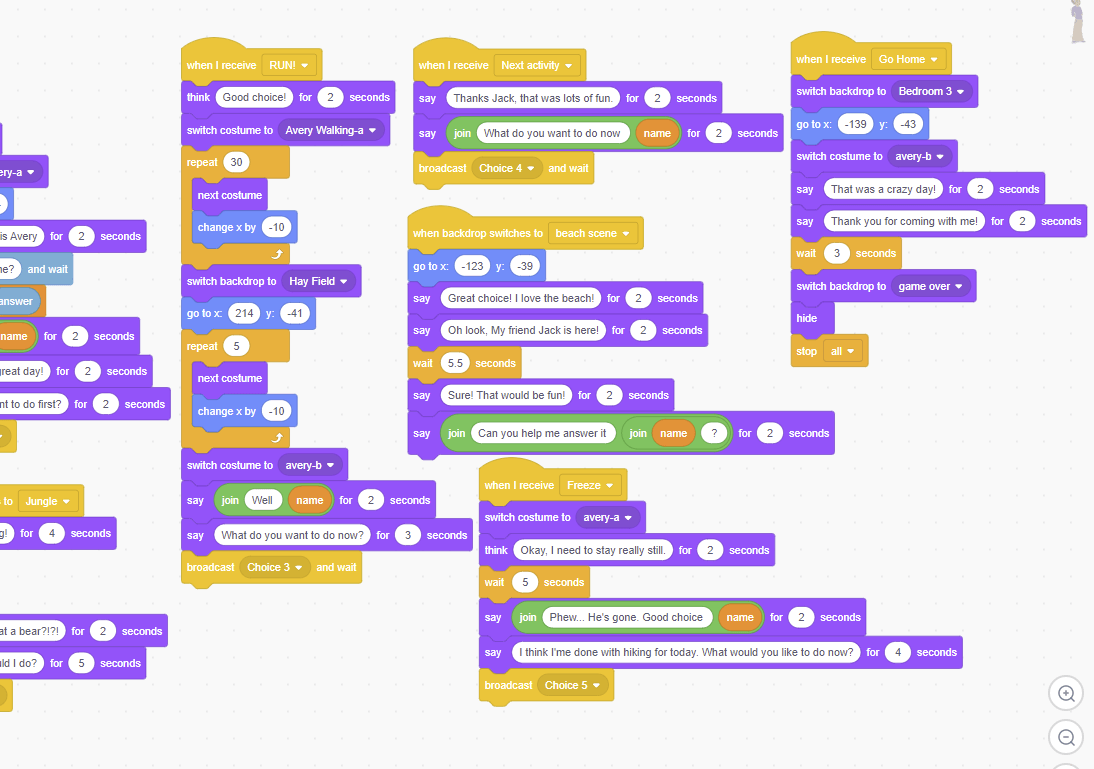
Now it’s time to move on to do the code for when the player chooses to go hiking. In this case, Avery (the character) will say “Wow! I love hiking”, wait for a second, and then change costumes for the new scenario she’s in. At this time, the bear sprite will appear on the screen, so we will need to code Avery’s reaction. To do this, she will think “Is that a bear? Quick! What should I do?”. After the character thinks these messages, we will need to broadcast the Choice 2 message to bring up the options of freeze or run. At this point, this code block is finished and it’s time to move on. Start by bringing out a “when I receive” block and select the run message. Underneath, make the character think “Good choice”, then change the costume to a walking costume. Next, we’ll create the walking animation by changing the costume and changing x by -10. This sequence will be repeated 30 times to make the character walk until they’re almost off-screen. Now, we will change the backdrop to the hayfield and repeat the same walking animation 5 more times. Finally, we will change the costume to a walking costume, and make the character say “Well (name), what do you want to do now?” before broadcasting Choice 3 to bring up the decision buttons. After this code is complete, it should look like this:
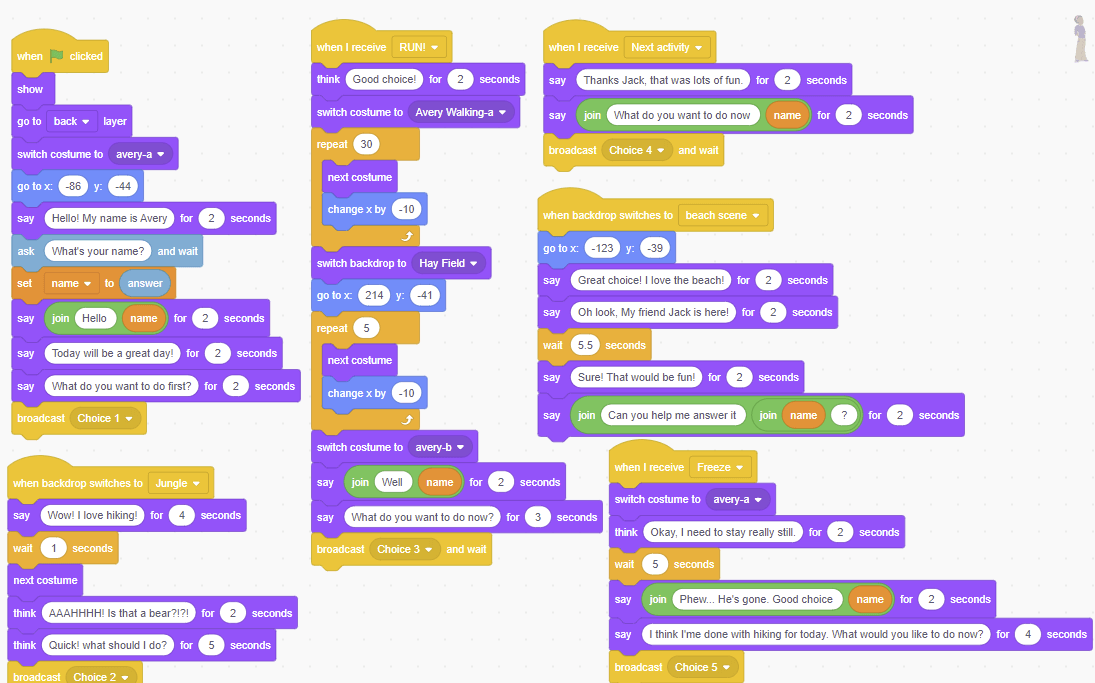
Now it’s time to write the code for when the player chooses to freeze. In this case, when the player receives the freeze message, the costume should shift to a talking pose before thinking “Okay, I need to stay really still”. Then, use a “wait 5seconds” block from the control category to make the character freeze for 5seconds. Finally, use the same join method we used earlier to say “He’s gone. Good choice (name)”. After this, you will broadcast the Choice 5 message to show the next option buttons. And with that, the code for the hiking choice is done, now it’s time to code the beach options. Start by using a “When backdrop changes to” block and select the beach option.
Underneath, set Avery’s location to (-123, -39)to place her in the right spot on the screen. Then, use the say blocks to make the character speak about how much they love the beach. After this is done, Jack’s code should be running and he will ask whether the player wants to try to solve a riddle, so we will wait 5.5 seconds in order to answer at the right time. After this wait, add the code to make Avery say “Sure that would be fun! “Can you help me (name)?”.
Hint: Make sure the timing of these talking blocks is well-timed, otherwise it will look like the characters are talking over and interrupting one another!
Now it’s time to write the code for after the game is complete and it’s time to make the next choice. To do this, simply grab a code block that says “when I receive” and select the Next Activity message. Then, make Avery say “Thanks Jack, that was lots of fun” before asking what the player wants to do next. To make the buttons show, make sure to broadcast the Choice 4 message at the end. Once you’re done, the code will look like this:
Finally, we’re onto creating the final code block. Start by checking whether the sprite has received the “Go Home” message. When it receives the message, we want the backdrop to change to the bedroom, and the character to go back to their starting position at (-139, -43). Change the costume back to a talking costume, and make the character say “That was a crazy day! Thank you for coming with me!”. This will signify the end of the game, so use a wait block to delay the next actions for 3 seconds before switching the backdrop to the game over message, hiding the sprite, and stopping all of the code.
Hint: The stop all block can be found under the control category and is used to stop all code that is running anywhere in the project.
Once this code is done, the entire project is complete! If you need to double-check the code for this section, it should look like this:
Project Complete!
And now we’re done! Feel free to test your game and see how it works. If you’re stuck with any steps or have any issues with your code, try reviewing it using the code shown throughout the article to see if you’ve made any mistakes.


%20(1)%20(1).png)


